Amazon S3 is a popular object storage service used to store both structured and unstructured data. With an S3-powered data lake, you can easily use the native AWS services for data processing, analytics, machine learning, and more.
S3 permissions for data lake destination
To successfully send data to your S3 data lake, you need to set the following permissions in your S3 policy:
"Action": [ "s3:GetObject", "s3:PutObject", "s3:PutObjectAcl", "s3:ListBucket"]Configuring S3 Data Lake destination in RudderStack
To set up S3 data lake as a destination in RudderStack, follow these steps:
- In your RudderStack dashboard, set up the data source. Then, select S3 Data Lake from the list of destinations.
- Assign a name to your destination and then click Continue.
Connection settings
- S3 Storage Bucket Name: Enter the name of the S3 bucket used to store the data before loading it into the S3 data lake.
- Register schema on AWS Glue: Enable this option to register the schema of your incoming data on AWS Glue's data catalog.
- glue:CreateTable
- glue:UpdateTable
- glue:CreateDatabase
- glue:GetTables
- AWS Glue Region: Enter your AWS Glue region. For example, for
N.Virginia, it would beus-east-1.
- S3 Prefix: If specified, RudderStack creates a folder in the S3 bucket with this prefix and pushes all the data within that folder.
- Namespace: If specified, all the data for the destination will be pushed to the location
s3://<bucketName>/<prefix>/rudder-datalake/<namespace>.
- Role Based Authentication: Enable this setting to use the RudderStack IAM role for authentication. For more information on creating an AWS IAM role for RudderStack, refer to this guide.
- IAM Role ARN: Enter the ARN of the IAM role.
If Role-based Authentication is disabled, you need to enter the AWS Access Key ID and AWS Secret Access Key to authorize RudderStack to write to your S3 bucket.
- Sync Frequency: Specify how often RudderStack should sync the data to your S3 data lake.
- Sync Starting At: This optional setting lets you specify the particular time of the day (in UTC) when you want RudderStack to sync the data.
Finding your data in S3 data lake
RudderStack converts your events into Apache Parquet files and stores them into the configured S3 bucket. Before storing the events, RudderStack groups them by the event name based on the UTC time they were received.
The folder structure is shown below:
s3://<bucketName>/<prefix>/rudder-datalake/<namespace>/<tableName>/YYYY/MM/DD/HHAs mentioned in the Connection settings section:
prefix: This is the S3 prefix in the destination settings. If not specified, RudderStack will omit this value.namespace: The namespace specified in the destination settings. If not specified, RudderStack sets this field to the source name by default.tableName: RudderStack sets this to the event name.YYYY,MM,DD, andHHare replaced by actual time values. A combination of these values represents the UTC time.
For example, suppose RudderStack tracks the following two events:
| Event name | Timestamp |
|---|---|
Product Purchased | "2019-10-12T08:40:50.52Z" UTC |
Cart Viewed | "2019-11-12T09:34:50.52Z" UTC |
RudderStack will convert these events into Parquet files and dump them into the following folders:
| Event Name | Folder Location |
|---|---|
Product Purchased | s3://<bucketName>/<prefix>/rudder-datalake/<namespace>/product_purchased/2019/10/12/08 |
Cart Viewed | s3://<bucketName>/<prefix>/rudder-datalake/<namespace>/cart_viewed/2019/11/12/09 |
Creating a crawler
In the absence of AWS Glue, you can create a crawler to go through your data and create table definitions out of it. Follow these steps:
- Go to your AWS Glue console and select Crawler from the left pane.
- Select Add Crawler.
- Specify a name for your crawler and click Next, as shown:

- Next, under the Crawler source type section, choose Data stores.
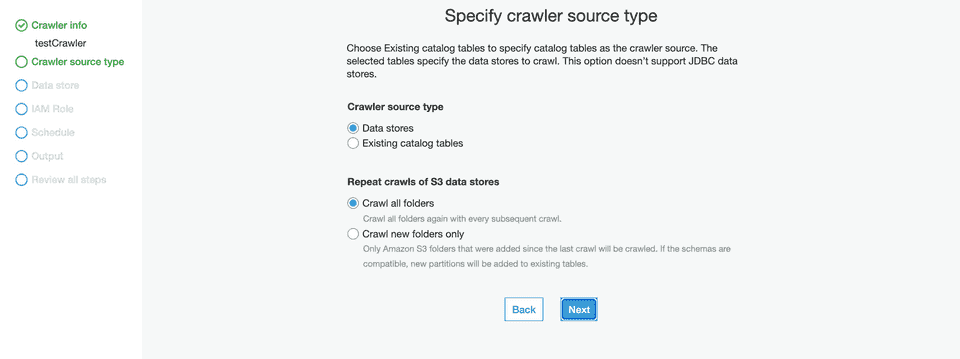
- Configure the Repeat crawls of S3 data stores based on your requirement.
- Then, under the Data store section, select S3 from the dropdown for the Choose a data store setting:
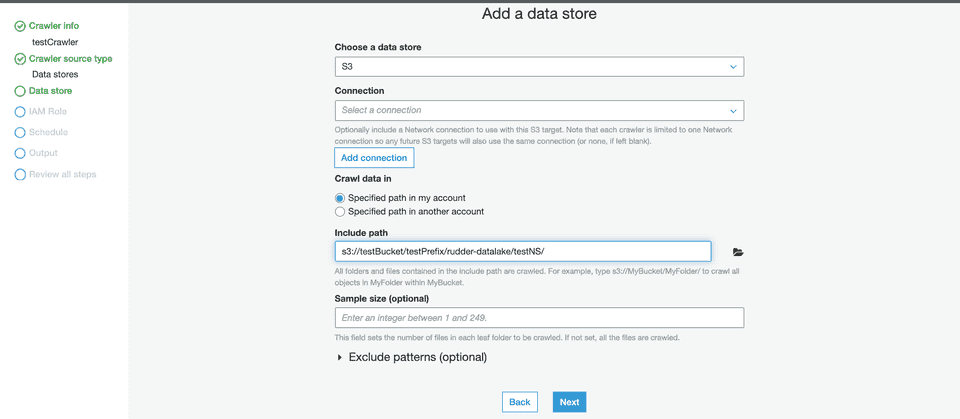
- For the Crawl data in setting, choose Specified path in my account.
- In the Include path setting, enter the S3 URI of your configured bucket followed by the suffix
/<prefix>/rudder-datalake/<namespace>/.
testBucket and the configured prefix and namespace are testPrefix and testNameSpace respectively, then your path should be:s3://testBucket/testPrefix/rudder-datalake/testNameSpace/s3://testBucket/rudder-datalake/testNameSpace/.- Then, under the Add another data store setting, select No, as shown:

- In the IAM Role section, configure a suitable IAM role.
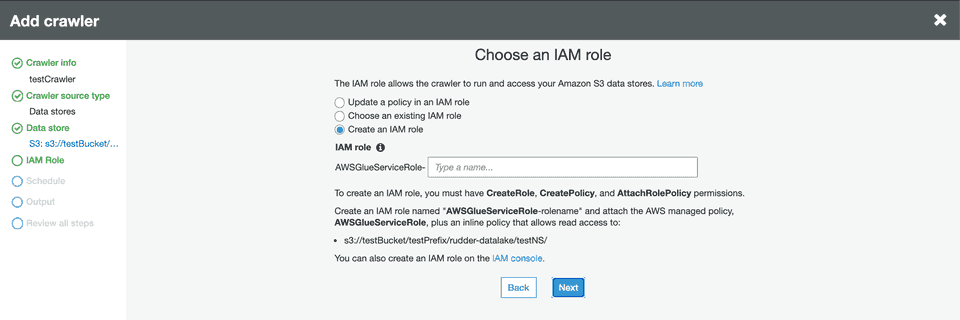
- In the Schedule section, select the frequency of your crawler from the dropdown options, as shown:

- In the Output section, configure the database that stores all the tables. Under the Grouping behavior for S3 data section, enable the Create a single schema for each S3 path option:
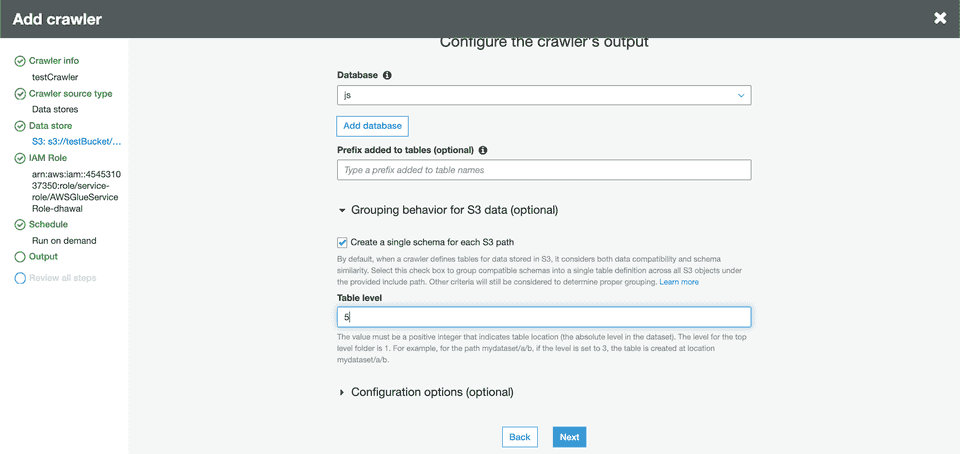
- Specify the Table level as 5 or 4 (refer to the tips below). This value indicates the absolute level of the table location in the bucket.
mydataset/a/b, if the level is set to 3, the table will be created at the location mydataset/a/b. Similarly, if the level is set to 2, the table will be created at the location mydataset/a.s3://testBucket/<prefix>/rudder-datalake/<namespace>/, make sure the table level is set to:- 5: If a prefix is configured.
- 4: If a prefix is not configured.
- Review your crawler configuration and click Finish to confirm.
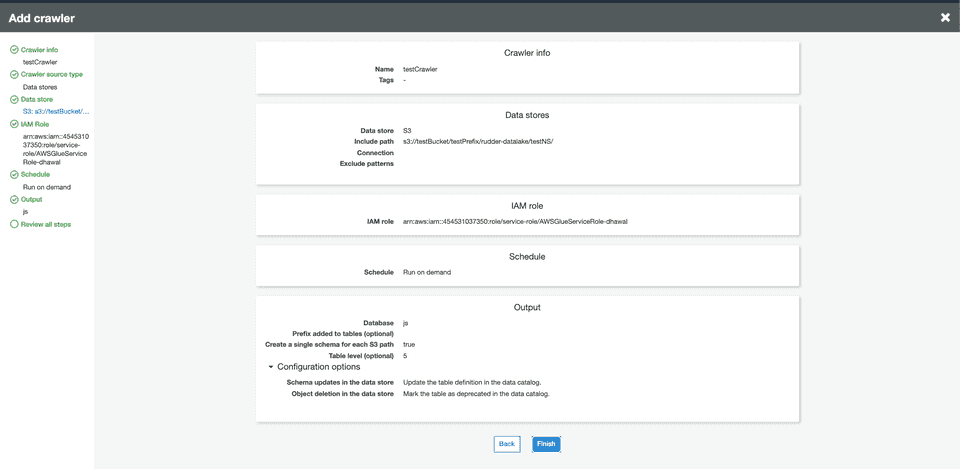
- Finally, click your crawler and run it. Wait for the process to finish - you should see some tables created in your configured database.
Querying data using AWS Athena
You can query your S3 data using a tool like AWS Athena which lets you run SQL queries on S3.
Follow these steps to start querying your data on s3:
- Open your AWS Athena console. Then, go to the same AWS region which was used while configuring AWS Glue.
- In the left pane, select
AwsDataCatalogas your data source, as shown:

- Select your configured namespace (or the database you specified while configuring the crawler) from the database dropdown menu.

- You should see some tables already created under the Tables section in the left pane.
- You can preview the data by clicking on the three dots next to the table and selecting the Preview Data option. Alternatively, you can run your own SQL queries in the workspace on the right, as shown:

IPs to be allowlisted
To enable network access to RudderStack, you will need to allowlist the following RudderStack IPs:
- 3.216.35.97
- 23.20.96.9
- 18.214.35.254
- 54.147.40.62
- 34.198.90.241
- 100.20.239.77
- 52.38.160.231
- 34.211.241.254
- 44.236.60.231
- 3.66.99.198
- 3.64.201.167
- 3.66.99.198
- 3.64.201.167
FAQ
For a comprehensive FAQ list, refer to the Warehouse FAQ guide.
Contact us
For more information on the topics covered on this page, email us or start a conversation in our Slack community.